
Motorcycles have proven to be a great alternative to cars as they can get into tight spaces, bringing the rider to their destination even in traffic jams. However, people who want to enjoy their motorcycles for a long time must maintain and clean their carburettors regularly. It can be tedious having to disassemble the carburettor before washing it. As a result, it is essential to know how to clean a motorcycle carburettor without removing it.
Due to external factors, the vents of a carburettor may get clogged up with impurities. This clogging can lead to engine stalling, difficulty in cold starting, unusual engine noises, etc. Although servicing carburettors may need an experienced mechanic, there are ways to clean them using a DIY approach. Simple steps such as washing the bike and removing the air filter are critical first steps in knowing how to clean a motorcycle carburettor without removing it.
This article will approach the subject using a step-by-step guide.
Why Should You Clean Your Motorcycle Carburetor?
Cleaning is vital to maintain an object or keep it in good condition. Over time the air dries up the gas in the carburettor, which creates a gummy substance that sticks to the enclosure of the carburettor. And this has to be cleaned to prevent problems like corrosion. Cleaning your carburettor also saves cost and helps the engine of the motorcycle function like it should.

There are essential reasons why one must clean their motorcycle’s carburettor. Some of these reasons include:
- Regular cleaning makes the carburettor last longer. The longer the motorcycle carburettor lasts, the better for the motorcyclist as it helps them save costs and frequent trips to the mechanic.
- Another reason to clean the carburettor is to prevent it from getting stuck. When a motorcycle becomes stuck, it is usually frustrating, and so to avoid this, it is essential to clean the motorcycle carburettor.
- A clean carburettor also conserves fuel.
- The engine and the motorcycle will be in generally good condition.
- It also prevents clogging of the carburettor.
Signs That Your Carburetor Needs Cleaning
- The carburettor is dirty: When the carburettor is taken out by the mechanic and can be seen to be unclean, then it is a sure sign that it needs cleaning.
- The motorcycle engine makes unusual sounds: Though this could mean something wrong with the engine, it could also tell that the carburettor is dirty. When the motorcycle starts to make unusual noises, the bike owner must clean the carburettor because that may be where the problem lies.
- Excess, black exhaust smoke: This is a common sign of a dirty carburettor. The black smoke means that the fuel entering the carburettor is high. As a result, it burns more fuel while covering shorter distances.
- The engine becomes lean: There isn’t enough fuel to mix with air in the carburettor because the carburettor is dirty.
- Poor engine performance: A dirty carburettor affects the overall condition of the motorcycle’s engine. Poor engine performance can also lead to the bike not starting correctly.
- Overheating: This is when the motorcycle’s engine or some other important part of the motorcycle becomes too warm. A dirty carburettor usually causes it. Excess fuel and too little fuel, caused by a dirty carburettor, can also result in overheating.
- The motorcycle doesn’t turn properly: This is another reason, but it’s not common. The bike may not even be able to move. The reason could be that the carburettor is dirty and needs cleaning.
Can You Clean A Motorcycle Carburetor Without Removing It?
Though cleaning a motorcycle carburettor without removing it is possible, it is doesn’t guarantee that the carburettor will be 100% clean. So if one wants thorough cleaning for the carburettor, they should remove it and clean it the conventional way to remove dirt and other sticky, greasy substances. However, below are some of the tips to know before cleaning a carburettor without removing it.
- The biker must keep in mind that this is not a deep cleaning and so there might still be some debris lodged in the carburettor.
- People should also know that sooner or later, they may be required to carry out proper cleaning of the carburettor.
- It should not replace the proper cleaning of the carburettor. It may seem easy and time-efficient, but to maintain a carburettor, one should thoroughly clean the carburettor occasionally.
- When the carburettor is cleaned without the carburettor being taken out, the outer part of the carburettor is guaranteed to be cleaner than the inner part of the carburettor.
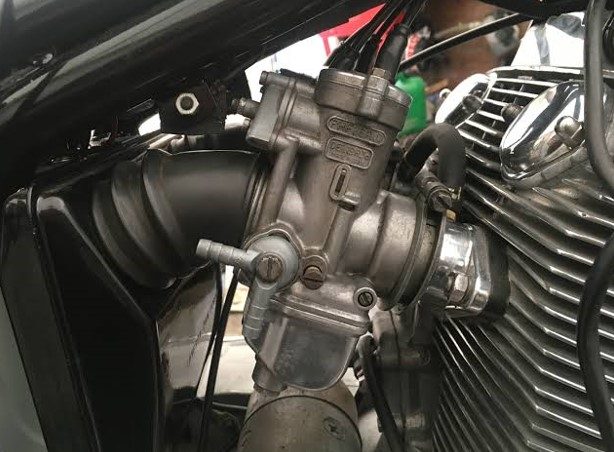
How To Clean A Motorcycle Carburetor Without Removing The Carburetor?
Cleaning a motorcycle carburettor without removing the carburettor can be pretty tricky. However, with some step-by-step approaches, any individual should be able to find their way around it. Also, strict adherence to these steps will enable easy and timely cleaning.
One should follow the steps below to carry out an effective cleaning on your motorcycle carburettor without necessarily removing it.
Step 1:
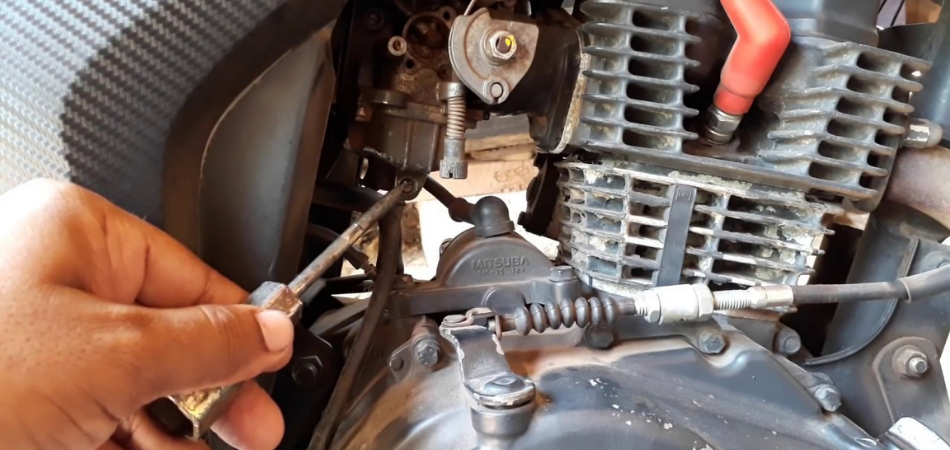
Put off the engine, wear protective gear, and remove the linkages, hoses, air filter housing, and the bottom bowl. When cleaning the carburettor, one should ensure that they start by wearing a pair of goggles and safety gloves to protect the face and hands. For additional protection, a face mask is ideal. Before disconnecting the spark plug, it is vital to ensure the engine has been switched off.
To access the carburettor:
- Find and remove the air filter and its housing.
- Remove all other accessories, including the surrounding linkages and hoses, to make things easier.
- For bolts and nuts, use the necessary hand tools to loosen them.
When the bike owner takes off the bowl located at the bottom of the carburettor, the gas will begin to leak. To prevent that, the person doing the servicing should close the petcock. This does not entirely rule out instances of gas drips. Hence, a paper towel or napkin should be laid down at the carburettor’s base. If there are some excess drips, they should be wiped with a towel. Once the dirty carburettor has been accessed, the next step comes in handy.
Step 2:
Use a cordless and handheld vacuum to vacuum away any grease, debris, dust, and dirt on the carburettor’s surface. The carburettor must have been covered in filth, including dust, grime, dirt, and debris. To get rid of these surface-level filths, use a small, cordless, and handheld vacuum. Before doing this, it is essential to determine the setting of the vacuum that will aid proper elimination.
Usually, a moderate or low setting should do the work. After placing the vacuum in this setting, run it on the parts carefully. While at it, one must ensure they take enough time to do a thorough job. The better this step is completed, the easier the next steps become.
Step 3:
Place cloths or rags at the carburettor’s base to collect drips/runoffs and prevent the surface from becoming contaminated. The paper towels or napkins used initially do not have enough capacity to withstand gas drips, especially runoffs. So, the mechanic may need to get some clothes and rags and place them at the bottom of the carburettor to collect the runoffs. This is because these materials have layers and are relatively thicker than paper towels and napkins. This way, one can rest assured there will be no damage to the surfaces.
Step 4:
Have a thin and even coat ready. Apply the carburettor alongside the choke cleaner in it. The fourth step is to apply the carburettor and choke cleaner. It is essential not to remove the outboard carburettor at this stage. To clean it, ensure it’s about half a palm’s length from the external shield. Shake it thoroughly, place a finger or two on the nozzle, and press it down to spritz.
Next, prepare a thin and even coat. While doing this, ensure the secondary connections and moving points such as the throttle area and linkage are not left out. After that, allow some time for the cleaning solution to do the rest. This will take some time, so a great deal of patience will be advantageous.
Step 5:
With extra help from a wire brush or stiff-brittle brush, use a microfiber towel to get rid of the filth. This should be done along with the cleaning solution. The prepared cleaning solution is still of great use here. Along with a microfiber towel, use it to wipe the filth away. Should there be sludges or solid buildups in some parts, use a stiff-brittle brush to eliminate them. If the mechanic doesn’t have a stiff-brittle brush, a wire brush can serve the same purpose. When necessary, apply the cleaning solution.
It is worth mentioning that steps three and four above can be repeated as many times as possible to get the best result. Ensure the carburettor is thoroughly clean before calling it a quit. Check every opening carefully, and clean again if necessary.
Step 6:
Use a dry and fresh towel to wipe the carburettor down. Ensure it gets dried completely. So, one should use a fresh and dry towel to wipe it down. The mechanic should ensure that they wipe adequately such that no excess moisture remains in the carburettor. After that, it should be allowed to dry. An hour or two should do. To verify, it will not be damp-to-touch.
Step 7:
Carry out a performance test on the engine. Before running this test, the cloths and rags placed at the bottom of the carburettor must have been removed. Also, ensure all the hand tools and materials have been removed. The engine can now be turned on to test its performance. This is an essential step in knowing how to clean a motorcycle carburettor without removing it.
To know if it’s in better shape, check the result. Suppose the results are not better than what one had before cleaning. In that case, it is advisable to repeat the steps. If the condition remains the same, removing the carburettor to clean it should be the best alternative. Although this might be a big task to get around with, it is worth trying to get the desired outcome.
Step 8:
Return the linkages, hoses, bottom bowl, air filter, housing, and other accessories to the original position. To complete the cleaning process, ensure every accessory is back in its place.
With these gradual steps, one can successfully clean a motorcycle carburettor without removing it. Motorcyclists can always refer back to these steps to clean their motorcycle carburettors from time to time. This will make the cleaning procedures more manageable and relatable in future cleaning.
However, another effective way to clean a carburettor without removing it is to mix fuel inside the fuel tank and leave it to circulate the carburettor. Then it should be cleaned with the steps above.
Conclusion
Understanding how to clean a motorcycle carburettor without removing it is an essential piece of information, especially for people who want to save time and cost. Using a stiff-brittle brush and a simple wiping down of the carburettor are imperative procedures in cleaning a motorcycle carburettor. A well-cleaned motorcycle carburettor will mean fewer cold starts and an overall well-maintained bike.