
If your Twin-cam Harley Davidson is making a loud clang at startup, chances are you have a bad compensator. You may also notice some trouble while shifting into first or neutral in that case. The best way to find out the problem is to inspect, but how to check a Harley compensator?
Here, I will guide you through how you can observe a bad compensator and the way you can check out the problem. The process of replacing a faulty compensator is also discussed. So, let’s get into it.
What is a Compensator on a Harley?
A Harley compensator functions as a shock absorber during the starter mechanism. It sits between the engine and the drivetrain and smoothens out any irregular pulses. After each power stroke, the compensator absorbs some energy and lowers the exhaust resistance from both processes for the next intake. In brief, it compensates for the high torque output from Twin-cam engines.
Basically, a Harley compensator-
- Smoothen rough pulses during startup mechanism.
- Reduces unwanted noises.
- Promotes a Harley motorcycle’s starting and starter life.
- Eliminates the tendency of forward-thrusts.
- Ensures that the transmission and drivetrain are safe from rough pulses.
Simply put, a Harley compensator sprocket promotes the reliability and durability of second-generation Twin Cam engines.
How to Tell if Harley Compensator Is Bad?
Harley riders face various types of problems with their bike. However, understanding the early warning signs can save a lot of time, effort, and money. And here’s how you can tell if your Harley compensator is going bad.

Loud clanking noise at startup
Imagine how a primary case filled with gravel would sound like if you shake it. Well, expect a similar clanking sound if there is an issue with your bike’s compensator. This generally happens at around 2200 RMP on the front side of the primary.
More vibration than usual
As the sprocket hub gets weaker, it starts rattling and spinning back and forth. This malfunction causes noise and vibration. If your compensator goes bad, you can feel the extra vibration in your Harley.
Difficulty in shifting gears
A faulty compensator fails to smooth out engine pulses, impacting the crankshaft, primary chain, and transmission. As a result, you may have some trouble shifting into neutral or first.
Apart from all that, a bad compensator will fail to start when the engine is too hot. The best way to know you have issues with your compensator sprocket is to remove the primary cover and check it out yourself.
How to Check Harley Compensator?
As mentioned above, you know how you can detect an issue with your Harley compensator. Now you’ll get to know how to look for the problem from this step-by-step guide below.
Step 1: Draining the chaincase fluid
Firstly, take a ride for a few minutes and shift through all five or six gears. After the bike cools off (around 10 minutes), look under the clutch cover for the primary chaincase drain plug. You’ll need a 3/8-inch Allen socket and a socket wrench to remove the plug. Now, drain the primary chaincase fuel into a pan.
Step 2: Inspecting for metal pieces
The drain plug has a magnetic end that attracts bits of metal floating in the chaincase fluid. Usually, there shouldn’t be any metallic pieces. But if you find any, know this is a sign of wear. Additionally, you can use a magnetic probe to inspect the drained fluid for metal pieces.
Step 3: Removing the clutch covers
First, locate your primary chaincase (usually on the left side) and remove the footboard and heel shifter. Then, you have to remove the clutch cover, inspection cover, and the gasket using a T27 Torx wrench or Allen wrench. There are two gaskets inside the primary chaincase- the cover and the chaincase tower. Remove them as well and safely store the screws for later installation.
Step 4: Looking for obvious defects
As the primary chaincase is wide open, now you can inspect the compensator sprocket, the primary chain and tensioner, and the clutch for any visible tear and wear.
Step 5: Checking the compensator parts
Before we go any further, you need to heat the sprocket bolt first and then use a hex socket and breaker bar to remove the nut. But do not use an impact wrench as it may damage the bolt. Also, you have to use a primary drive locking tool during the whole process.
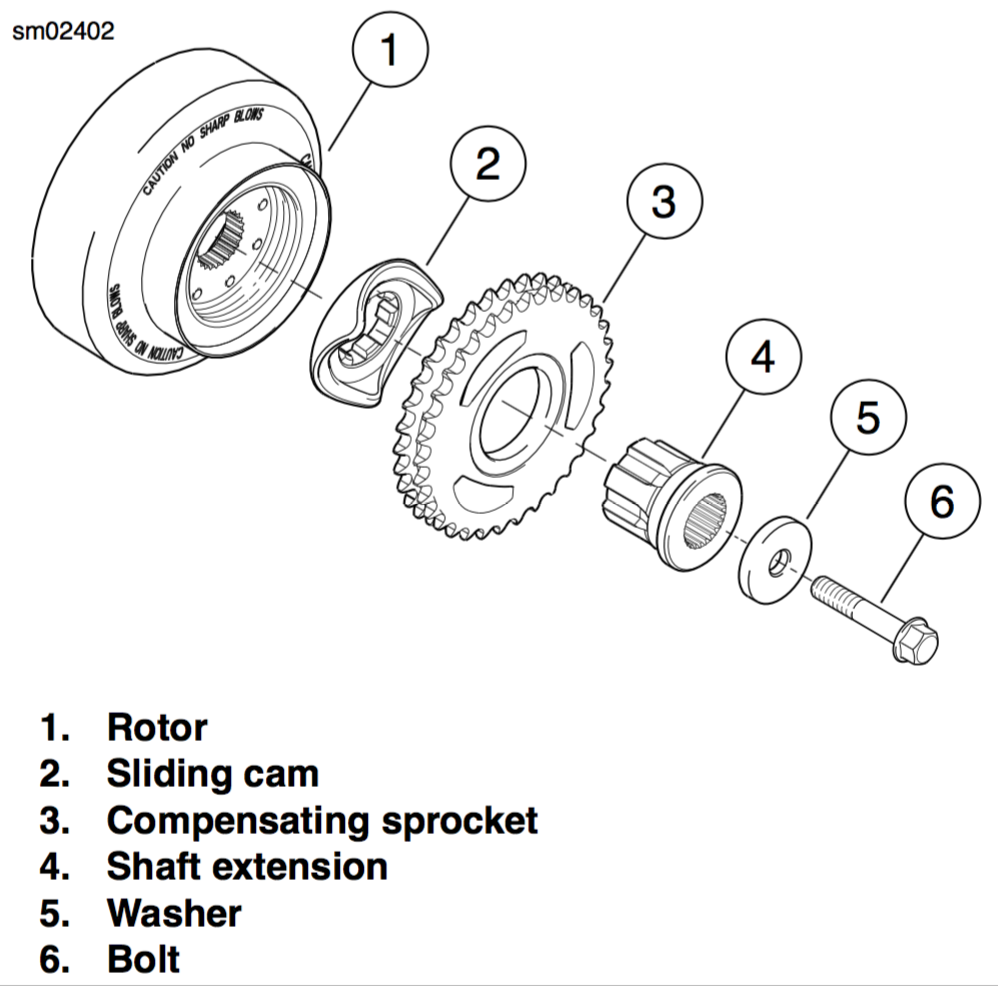
Finally, you can now release the spacer, sprocket cover, sliding cam, compensating sprocket, and the shaft extension for close inspection. If there’s any crack, corrosion, or damage, you will need to repair or remove the affected parts.
Step 6: Cleaning and maintenance
If you are lucky enough, you may not need a complete replacement. In that case, you can thoroughly clean the sprocket not internal threads and the engine sprocket shaft with the Loctite 7649 cleaner/primer or something similar. Then, apply the thread locker to the sprocket shaft’s threads and put some engine oil to the underside of the sprocket nut. You can also use transmission fluid for Harley 6 speed. This fluid lubricates & clears along with gear shifts.
How to Replace a Harley Compensator?
If you have already figured out something is wrong with the compensator, you have to replace the sprocket, sprocket cover, spacer, and sliding cam. You will need 75ft pounds of torque to tighten the sprocket bolt. It’s best if you do it with a torque wrench and a hex socket.
Now, you have to install a new primary chaincase cover, a new gasket, and two new chaincase tower gaskets for optimum results.
Remember the screws you safely stored? Well, now it’s time to re-install them to reset all other parts securely. The primary cover requires 120 inch-pound of torque to tighten the screws with an Allen socket and a torque wrench. The sequences, however, are generally described in the motorcycle service manual.
In addition, you’ll need a few more purchases- an inspection cover gasket and a new drain plug (check user manual). Coat the drain plug threads with Teflon paste as it is chemically unreactive and can resist high temperatures.
In the end, you have to properly fill-up the primary chaincase with the chaincase lubricant and install a new clutch cover.
Conclusion
A bad compensator will not slip past your attention, and this problem needs a quick solution. If your Harley Davidson stock compensator fails to deliver a smooth ride, maybe you should consider an upgrade. After all, the bike starts a lot easier and provides excellent shock absorption with this particular upgrade.
Before doing so, you now know how to check Harley compensator for faults that are causing the issue, especially with the clunking noise!
Now, you can easily replace your faulty compensator as I have covered all the necessary knowledge you need throughout the process.